
Importing Transactions
Importing
Walk through the process of importing and how to make sure your settings are correct in Google to use this feature.
Setup for Importing
Check Your Google Drive Settings
Your Google Drive settings must convert the financial institution CSVs to Google Docs format automatically to be able to upload the financial CSV files in order to import your transactions. To make sure you have the correct Google Drive settings, open a new tab in Chrome, click the Google Apps icon (looks like a waffle) in the upper right of your screen > open Drive > Settings (looks like a gear) > Settings make sure the box is checked for Convert uploaded files to Google Docs editor format.
Watch this 2.5-minute video to see how to setup your Google Drive settings.
Before setting up an account for importing you’ll need to download transactions from your bank in a CSV or Excel file format and upload it to the Financial CSV File folder found on the Settings page. Note: the file name must have a CSV file extension.
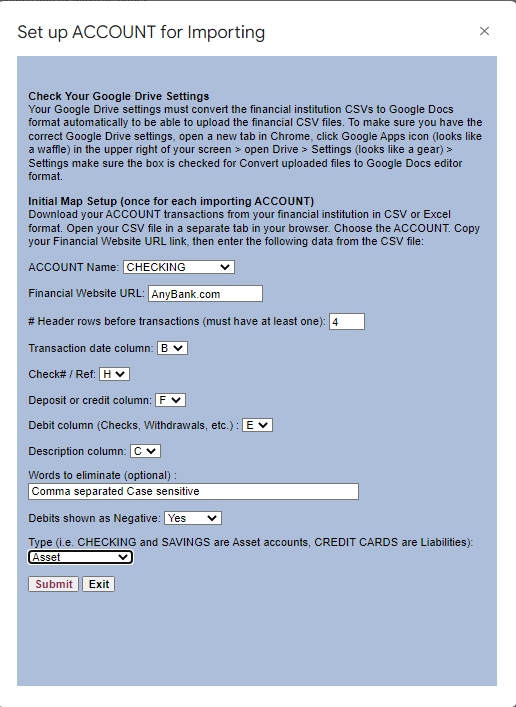
Initial Map Setup (once for each importing ACCOUNT)
Download your ACCOUNT transactions from your financial institution in CSV or Excel format. Open your CSV file in a separate tab in your browser then use your downloaded CSV file to enter the data similar to the data found on the following example:
Import Transactions
The Importing feature will allow you to get caught up quickly and is ideal for users that prefer to keep their books in an after-the-fact manner. There are 4 steps to follow to import your data correctly but it is well worth the effort!
Step 1: Go to your financial institution and download (export) your transactions in CSV (or Excel) format. You will want to rename the file to coincide with the ACCOUNT you will import to such as “Checking Account 20220131.csv.”
Step 2: From the Main Menu click > Manage ACCOUNTS > Financial CSV Files > then right-click anywhere on the screen and Upload files.
Step 3: Click on Import Transactions and use the dropdowns to select ACCOUNT and CSV file, then click Submit (as shown in this sheet):
![]()
Step 4: Verify the transactions have been added to your ACCOUNT then categorize them to complete the process.
Note: When importing credit card transactions and payments you need to be careful not to duplicate the payments. Only import payments for credits cards from the checking account statement or the credit card statement, but not both.